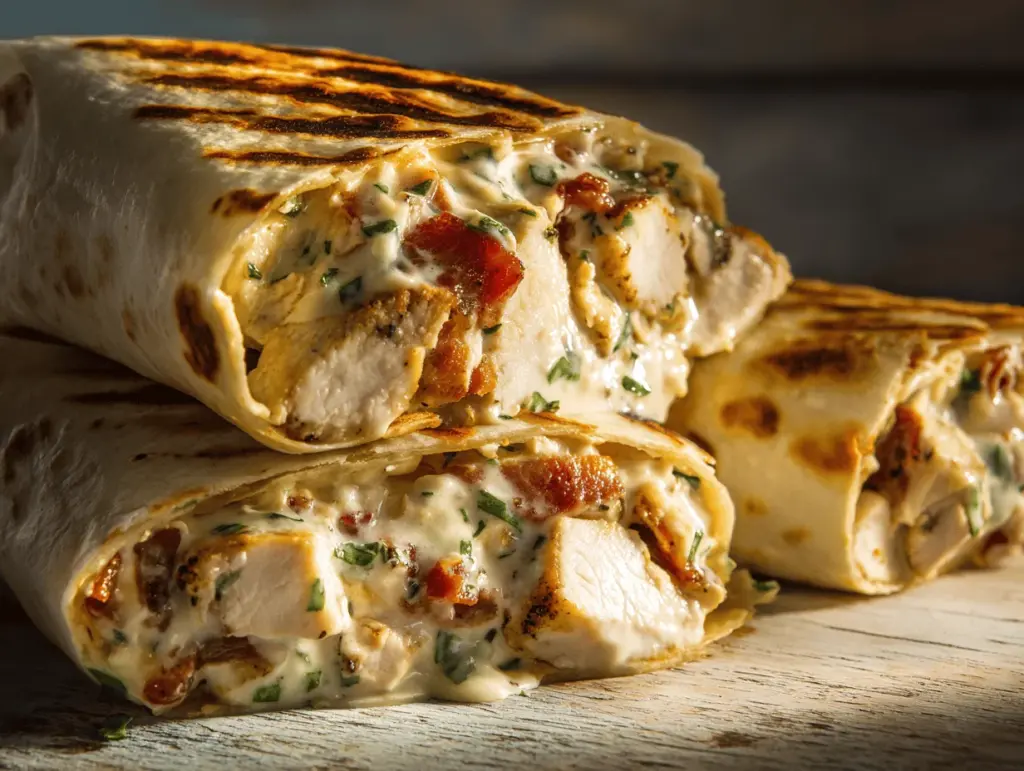
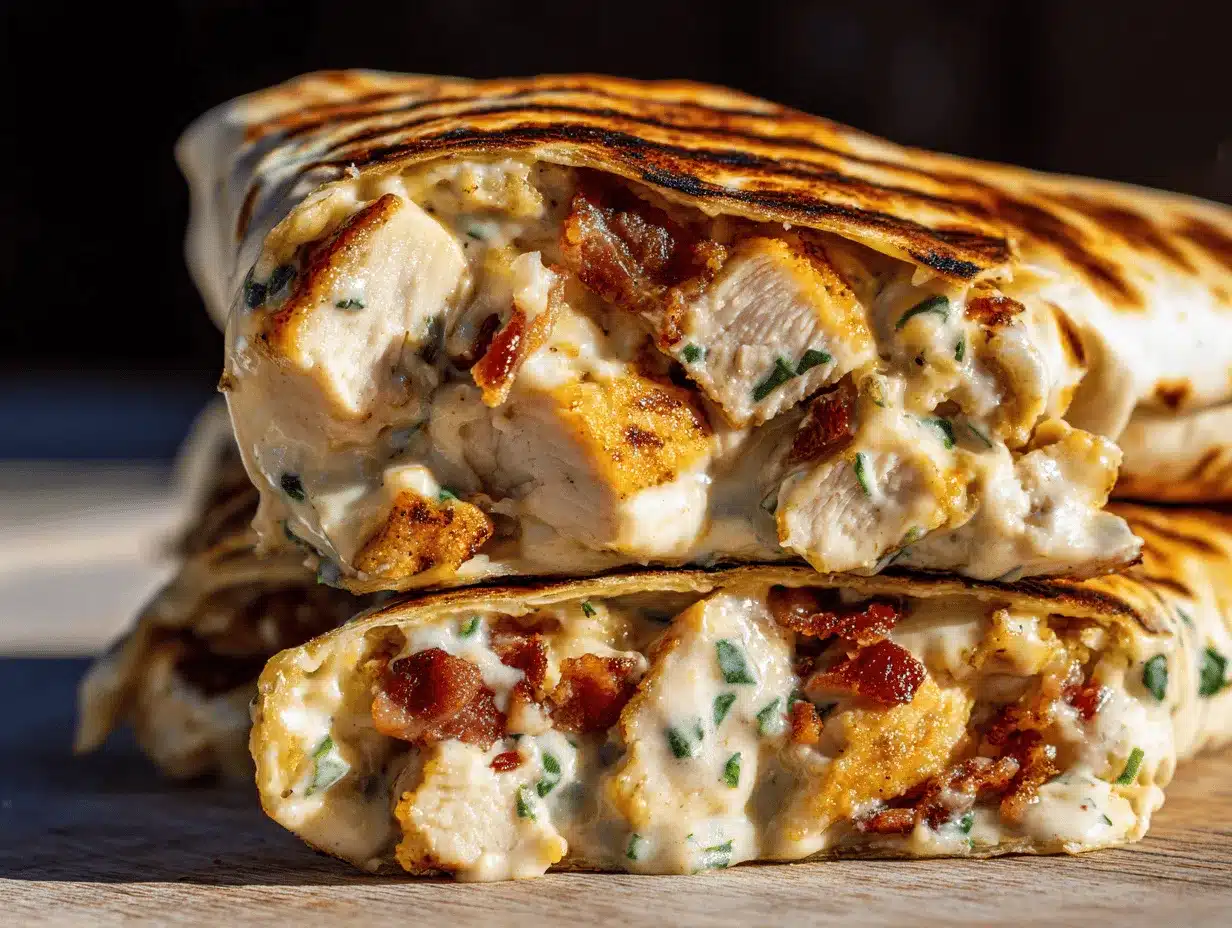
Imagine biting into a warm, golden wrap oozing with melted cheese, juicy chicken, smoky bacon, and that unmistakable tang of ranch. That first bite? Pure comfort. I still remember the first time I threw together these cheesy ranch chicken bacon wraps—late-night, fridge nearly empty, and I just wanted something easy but totally satisfying. The moment that ranch dressing hit the skillet with the chicken, my kitchen smelled like a diner but in the best possible way. Now, these wraps are a staple in my meal prep rotation—quick to make, easy to stash for later, and they disappear fast (even with picky eaters around!). Whether you need a weeknight dinner or a grab-and-go lunch, this cheesy ranch chicken bacon wraps recipe just never lets me down.
I’ve played around with a few versions—trying different cheeses, wraps, and even sneaking in extra veggies—but this classic combo always comes out on top. There’s something so comforting about the way creamy ranch ties everything together. If you’re all about easy meals with big flavor (and minimal cleanup), this is about to become your new favorite. As someone who’s made these wraps at least two dozen times, I can say they’re just as good the next day. Trust me, you’ll want leftovers. And honestly, who can resist bacon and cheese wrapped up in a toasty tortilla?
From busy families to meal preppers, anyone who loves a hearty, cheesy, soul-soothing meal is going to appreciate these wraps. Whether you’re feeding a crowd or just yourself on a hectic weeknight, you can count on this recipe for cheesy ranch chicken bacon wraps to deliver every single time. Let me walk you through my go-to method, plus all the tasty secrets I’ve picked up along the way.
Why You’ll Love This Cheesy Ranch Chicken Bacon Wraps Recipe
- Quick & Easy: Ready in about 30 minutes, these wraps are perfect for busy nights when you need dinner on the table, stat. No hours spent slaving over the stove!
- Simple Ingredients: Everything you need is probably already in your fridge or pantry. No weird specialty items—just real, straightforward food.
- Ultimate Comfort Food: Cheesy ranch chicken bacon wraps are everything you crave on a tough day—creamy, savory, and oh-so-satisfying. They’re the kind of meal that makes you pause and close your eyes after the first bite.
- Meal Prep Friendly: These wraps reheat beautifully, so you can prep them ahead for lunches or dinners all week. They don’t get soggy and still taste amazing even after a couple of days in the fridge.
- Crowd-Pleaser: I’ve served these at game nights, family get-togethers, and even my kids’ sleepovers. There’s never a crumb left—everyone wants the recipe.
- Flexible & Customizable: Whether you want to sneak in some veggies, swap the cheese, or try a different wrap, this base recipe is endlessly adaptable. You can even make it low-carb with a simple swap.
What sets these cheesy ranch chicken bacon wraps apart from the rest? For starters, I blend real ranch dressing right into the chicken and cheese mix, so every bite is packed with flavor—not just the edges. Bacon is cooked crisp (no sad, floppy bacon here!), and I use a two-cheese combo for maximum gooeyness. The whole thing gets toasted in the skillet, so you get that irresistible crunch on the outside and melty goodness inside.
Honestly, these wraps aren’t just another easy meal—they’re a little taste of comfort that you can whip up any night of the week. They’re cozy, they’re reliable, and they just make dinner (or lunch, or snack time) better. If you’re looking for a meal that will keep everyone coming back for seconds, this is it. You’ll see why I keep making these again and again—no regrets, just lots of happy faces!
What Ingredients You Will Need
This cheesy ranch chicken bacon wraps recipe keeps things simple but doesn’t skimp on flavor. Every ingredient plays its part, and you probably already have most of them hanging out in your kitchen. Here’s what you’ll need:
- For the Filling:
- Chicken breast, cooked and shredded (about 2 cups/300g) – Rotisserie chicken works great for saving time.
- Bacon, cooked and crumbled (6 slices/90g) – I like thick-cut for extra crunch, but any bacon is good.
- Cream cheese, softened (4 oz/115g) – Gives the filling that creamy, dreamy texture.
- Shredded cheddar cheese (1 cup/110g) – Sharp or mild, your call. I prefer sharp for a stronger flavor.
- Shredded mozzarella cheese (1 cup/110g) – For that gooey melt; you can swap with Monterey Jack if you like.
- Ranch dressing (1/3 cup/80ml) – Use your favorite brand. I love the classic Hidden Valley, but homemade ranch is next-level if you have time.
- Green onions, thinly sliced (2-3 stalks/30g) – Optional, but adds a fresh bite and color.
- Garlic powder (1/2 tsp/2g) – A little hint of savory depth.
- Black pepper (1/4 tsp/1g) – Freshly ground makes a difference.
- For the Wraps:
- Large flour tortillas (4-6, depending on size/200-250g) – Go for the burrito-sized ones for maximum filling. You can use whole wheat or gluten-free if you like.
- Butter or olive oil (for toasting, about 2 tbsp/28g) – Gives the wraps that golden, crispy finish.
Ingredient Tips & Substitutions:
- If you want to lighten things up, use low-fat cream cheese and reduced-fat cheese. It still melts beautifully!
- Swap in cooked turkey bacon for a lighter twist, or leave out the bacon for a vegetarian version.
- If you’re gluten-free, grab your favorite GF tortillas—they work just fine.
- Don’t have ranch? Mix 2 tbsp mayo, 2 tbsp sour cream, a splash of milk, and a sprinkle of dried dill and garlic powder for a quick hack.
- Add some chopped bell pepper, spinach, or even jalapeños if you want to sneak in veggies or heat.
- Not a cheddar fan? Try Colby Jack or pepper jack instead.
Honestly, once you get the hang of this cheesy ranch chicken bacon wraps recipe, you’ll find yourself tossing in whatever odds and ends need using up. That’s half the fun!
Equipment Needed
- Large mixing bowl: For combining your filling. If you don’t have one, a medium-sized bowl works—just be careful not to spill when mixing.
- Skillet or griddle: I like using a nonstick skillet for easy cleanup, but a cast iron pan gives you the best crispy edges. Even an electric griddle will do if you’re making several at once.
- Spatula: A wide spatula helps flip the wraps without tearing them.
- Sharp knife & cutting board: For dicing chicken, slicing bacon, and chopping green onions.
- Measuring cups and spoons: Always handy for getting your ranch and cheese just right.
- Small bowl: If you’re prepping your own ranch dressing or mixing butter with a little garlic for extra flavor on the wraps.
If you don’t have a large skillet, you can toast these wraps in the oven at 425°F (220°C) for about 10 minutes—just pop them on a baking sheet lined with parchment. I’ve done this when cooking for a crowd, and it works surprisingly well. For cleaning, a quick soak in warm soapy water keeps your skillet looking good as new.
Budget tip: If you don’t have a fancy griddle, don’t sweat it! Just use whatever frying pan you’ve got. I’ve even used a sandwich press in a pinch, and it worked (a little messy, but delicious results). The most important thing is getting that filling hot and the outside crisp!
How to Make Cheesy Ranch Chicken Bacon Wraps
-
Prep the Filling:
Time: 10 minutes
In a large mixing bowl, add 2 cups (300g) cooked shredded chicken, 6 slices (90g) cooked and crumbled bacon, 4 oz (115g) softened cream cheese, 1 cup (110g) shredded cheddar, 1 cup (110g) shredded mozzarella, 1/3 cup (80ml) ranch dressing, 2-3 sliced green onions, 1/2 tsp (2g) garlic powder, and 1/4 tsp (1g) black pepper. Stir everything together until well combined and creamy. The filling should look thick and chunky—don’t worry if it’s a little lumpy from the cream cheese, that’s normal. -
Warm Your Tortillas:
Time: 2 minutes
Stack your flour tortillas (4-6) and wrap them in a clean damp paper towel. Microwave for 30 seconds to make them pliable. This step helps keep them from cracking when you roll them up. If you skip this, you might end up with split wraps—trust me, I’ve learned the hard way! -
Assemble the Wraps:
Time: 5 minutes
Lay out a tortilla and spoon about 1/2 to 3/4 cup (100-150g) of the filling down the center, leaving about 1 inch (2.5cm) on each side. Fold the sides in, then roll up tightly from the bottom like a burrito. Place seam-side down while you prep the rest. -
Toast the Wraps:
Time: 10 minutes
Heat 1/2 tbsp (7g) butter or oil in a nonstick skillet over medium heat. Once hot, add 2 wraps seam-side down. Cook for 2-3 minutes each side, pressing gently with your spatula, until golden brown and the cheese inside is melted. If your pan is smaller, just do one at a time. -
Repeat:
Time: 5-10 minutes
Wipe out the skillet if needed and add more butter or oil as you go. Continue toasting all wraps. If you’re making a big batch, keep finished wraps warm on a baking sheet in a 200°F (95°C) oven. -
Slice & Serve:
Time: 2 minutes
Let wraps cool for a minute, then slice diagonally for that classic café look. Serve hot, with extra ranch for dipping if you’re feeling indulgent.
Troubleshooting:
- If your wraps split, they’re probably overfilled or too cold—warm tortillas are a must.
- Filling leaking out? Try sealing the edge with a little extra cheese before toasting—it works like edible glue.
- Wraps not browning? Bump up the heat just a tad, but keep an eye out so they don’t burn.
Personal tip: I always make a double batch and freeze half—future me is always grateful. And don’t stress if some cheese oozes out in the pan. Those crispy, cheesy bits are the best part!
Cooking Tips & Techniques
- Don’t Rush the Toasting: Give the wraps a couple of minutes on each side. You want that deep golden brown, not pale and floppy. If you flip too soon, the cheese won’t melt right and you’ll miss out on that satisfying crunch.
- Perfect Bacon Every Time: Bake your bacon on a sheet pan at 400°F (200°C) for 15-18 minutes. It comes out super crisp and less greasy than frying. Plus, less mess!
- Mix the Filling Well: Make sure the ranch and cheeses are evenly distributed. If you hit a dry patch, it’s just not as tasty (learned that after one too many “meh” bites).
- Don’t Overfill: If you pack too much in, the wraps can split or leak. I used to be guilty of “just one more spoonful” and always regretted it. Less is more for a tidy, melty finish.
- Press Down Gently: Use your spatula to gently press the wraps as they toast. This helps everything stick together and gives you that café-style grilled look.
- Keep Warm in the Oven: If you’re making a batch for a crowd, lay finished wraps on a baking sheet and keep them warm in a low oven. That way, everyone gets a hot and crispy wrap!
If you’re multitasking, prep your filling while the bacon cooks and warm the tortillas just before assembling. And don’t be afraid to experiment with cheese blends—sometimes I’ll toss in a little smoked gouda for extra flavor. The biggest mistake I ever made? Forgetting to soften my cream cheese. The filling was impossible to mix and came out lumpy. Always let it sit at room temp or zap it for a few seconds in the microwave.
Consistency is all about not overfilling and getting that cheese melt just right. And if you ever end up with slightly burnt edges, just call it “extra flavor”—my family never complains!
Variations & Adaptations
- Low-Carb/Keto: Swap flour tortillas for low-carb wraps or large lettuce leaves. Use full-fat cheese and ranch for a keto-friendly version—just skip the sugar in your ranch if you’re strict.
- Spicy Kick: Add a few slices of pickled jalapeños or a shake of hot sauce to the filling. Pepper jack cheese also works wonders for spice lovers.
- Veggie-Loaded: Mix in a handful of chopped spinach, bell peppers, or mushrooms. I love sneaking in extra greens when I can—no one complains when there’s enough cheese!
- Different Cooking Methods: Try baking assembled wraps at 425°F (220°C) for 10 minutes, flipping halfway. Or use an air fryer at 375°F (190°C) for 5-7 minutes—extra crispy!
- Allergen-Friendly: Use dairy-free cheese and ranch if you’re avoiding dairy. Gluten-free tortillas are readily available now—just be sure to warm them so they don’t crack.
One of my favorite twists? Adding a smear of BBQ sauce inside before rolling up. The smoky-sweet flavor with the ranch is just unreal. Or, try swapping out the chicken for leftover turkey after the holidays. These wraps are super forgiving, so don’t be afraid to play around!
Serving & Storage Suggestions
Cheesy ranch chicken bacon wraps are best served hot and crispy, right out of the skillet. I like to slice them in half on a bias for a fun presentation—plus, the melted cheese oozes out and looks so tempting. Serve with extra ranch or a side of salsa for dipping if you’re in the mood to dunk.
Pair these wraps with a crisp green salad, sweet potato fries, or even a bowl of tomato soup for the ultimate comfort meal. They’re also great with iced tea, lemonade, or a fizzy soda for a casual lunch.
To store, let wraps cool, then wrap tightly in foil or plastic wrap. They’ll keep in the fridge for up to 4 days. For longer storage, wrap individually and freeze for up to 2 months—just thaw overnight before reheating.
To reheat, pop in a 350°F (175°C) oven for 10 minutes, or crisp up in a skillet over medium heat. Microwaving works in a pinch, but you lose the crispy shell—so I always go for the oven or skillet when I can. The flavors actually meld and get even better after a day or two!
Nutritional Information & Benefits
Each cheesy ranch chicken bacon wrap (using large flour tortillas and full-fat ingredients) clocks in at roughly 420-480 calories, with 28-32g protein, 28g fat, and 25-30g carbs. Not bad for serious comfort food! Using low-fat cheese and whole wheat wraps cuts the calories and ups the fiber.
Key ingredients like chicken and cheese are solid protein sources, and bacon—well, it’s bacon! You also get some calcium and vitamin D from the dairy, plus a dose of happiness from that ranch flavor. If you’re gluten-free, just use GF tortillas and ranch. Allergens here include dairy, wheat, and egg (sometimes in ranch), so always check labels if you’re sensitive.
Personally, I love this recipe because it keeps me full for hours and gives me a little boost after a long day. It’s the kind of meal that feels like a treat but still fits into a balanced lifestyle, especially with a side of veggies. Comfort food with a little backbone—just how I like it!
Conclusion
If you’re searching for the ultimate comfort food that’s easy, cheesy, and totally satisfying, look no further than these cheesy ranch chicken bacon wraps. They hit all the right notes—flavor, texture, and pure happiness in every bite. Whether you stick to the classic recipe or put your own spin on it, you’ll find this meal fits perfectly into hectic weekdays or lazy weekends.
I keep coming back to this recipe because it’s reliable, adaptable, and always a crowd-pleaser. Don’t be afraid to make it your own—swap the cheese, add veggies, or go spicy if that’s your thing. I hope you love these wraps as much as my family and I do!
If you try this cheesy ranch chicken bacon wraps recipe, leave a comment below and tell me how it went! Share your favorite additions or any clever tweaks. And hey, if you snap a photo, tag me—I’d love to see your creations. Happy wrapping, friends!
Frequently Asked Questions
Can I make cheesy ranch chicken bacon wraps ahead of time?
Absolutely! Assemble and store un-toasted in the fridge, then toast them up fresh when ready to eat. They also freeze beautifully—just thaw and crisp up in a skillet or oven.
What’s the best way to reheat these wraps?
For the crispiest results, reheat in a 350°F (175°C) oven or in a dry skillet over medium heat until hot and crisp. Microwaving is quick but loses that crunchy shell.
Can I use pre-cooked or rotisserie chicken?
Yes, pre-cooked or rotisserie chicken saves time and works perfectly. Just shred it or chop it up before mixing into the filling.
How do I keep the wraps from getting soggy?
Don’t overfill and make sure to toast the wraps until golden. Cooling slightly before wrapping for storage also helps keep them from steaming inside the wrap.
What are the best gluten-free options for this recipe?
Use your favorite gluten-free tortillas and check that your ranch dressing is gluten-free. The rest of the ingredients are naturally gluten-free—easy swap, same great flavor!
Print
Cheesy Ranch Chicken Bacon Wraps
- Total Time: 30 minutes
- Yield: 4-6 wraps (4-6 servings) 1x
Description
These Cheesy Ranch Chicken Bacon Wraps are the ultimate comfort food—oozing with melted cheese, juicy chicken, crispy bacon, and tangy ranch, all wrapped in a golden, toasted tortilla. Perfect for meal prep, busy weeknights, or a crowd-pleasing lunch, they’re quick, easy, and always satisfying.
Ingredients
- 2 cups cooked and shredded chicken breast (about 10 oz)
- 6 slices bacon, cooked and crumbled
- 4 oz cream cheese, softened
- 1 cup shredded cheddar cheese
- 1 cup shredded mozzarella cheese
- 1/3 cup ranch dressing
- 2–3 green onions, thinly sliced (optional)
- 1/2 teaspoon garlic powder
- 1/4 teaspoon black pepper
- 4–6 large flour tortillas (burrito size, about 10-inch)
- 2 tablespoons butter or olive oil (for toasting)
Instructions
- In a large mixing bowl, combine shredded chicken, crumbled bacon, softened cream cheese, cheddar cheese, mozzarella cheese, ranch dressing, green onions (if using), garlic powder, and black pepper. Stir until well combined and creamy.
- Stack the tortillas and wrap them in a clean damp paper towel. Microwave for 30 seconds to make them pliable.
- Lay out a tortilla and spoon about 1/2 to 3/4 cup of the filling down the center, leaving about 1 inch on each side. Fold the sides in, then roll up tightly from the bottom like a burrito. Place seam-side down while you prep the rest.
- Heat 1/2 tablespoon butter or oil in a nonstick skillet over medium heat. Once hot, add 2 wraps seam-side down. Cook for 2-3 minutes per side, pressing gently with a spatula, until golden brown and the cheese inside is melted.
- Repeat with remaining wraps, adding more butter or oil as needed. Keep finished wraps warm on a baking sheet in a 200°F oven if making a large batch.
- Let wraps cool for a minute, then slice diagonally. Serve hot, with extra ranch for dipping if desired.
Notes
For best results, don’t overfill the wraps and always warm tortillas before assembling to prevent splitting. Use rotisserie chicken for a shortcut. To make gluten-free, use GF tortillas and ranch. Wraps can be frozen and reheated in the oven or skillet for best texture. Add veggies or swap cheeses for variety. For extra crispiness, press wraps gently with a spatula while toasting.
- Prep Time: 15 minutes
- Cook Time: 15 minutes
- Category: Main Course
- Cuisine: American
Nutrition
- Serving Size: 1 wrap (about 7-8 inches, 1/4 to 1/6 of recipe)
- Calories: 450
- Sugar: 3
- Sodium: 950
- Fat: 28
- Saturated Fat: 13
- Carbohydrates: 28
- Fiber: 2
- Protein: 30
Keywords: chicken bacon ranch wrap, cheesy chicken wrap, meal prep wraps, easy chicken wrap, comfort food, skillet wrap, lunch wrap, dinner wrap, bacon cheese wrap